Oh Snap.

Gingersnap, of course!

My mother has thrown down the gauntlet, and challenged me to a gingerbread house contest. The deadline is New Year’s Eve, and I’m in the process of testing out gingerbread recipes, because mine has to win. Not every recipe is cut out for a career in architecture, so I’m finding other uses for the copious amounts of gingerbread dough in my fridge.

This particular recipe, the gingerbread from Bittman’s How To Cook Everything (which, side note, is becoming my new favorite resource, even though I totally used to say I wasn’t into cookbooks), makes perfect ginger snaps. I’ve been dipping them in my morning coffee.

The Recipe: Gingersnaps, adapted from Mark Bittman’s recipe featured in How To Cook Everything

Yield: 4-5 dozen
Time: 40 minutes

2 sticks unsalted butter, softened
1 cup sugar, plus 1 tsp for sprinkling
1 cup mild molasses (or blackstrap for more savory gingersnaps)
1 tsp baking soda
3 1/2 cups flour
1 tbsp ground ginger
1 tbsp ground cinnamon
pinch salt

Do This
Cream together the butter, sugar, and molasses. In a separate bowl, whisk together the flour, salt, cinnamon, and ginger — which, by the way, smells really awesome.

Mix the baking soda with a couple of tablespoons of warm water, and add to the butter/sugar/molasses mixture. Gradually stir in the dry ingredients, and blend well. Shape the dough into a big lump, wrap in plastic, and refrigerate for a couple of hours.

Preheat the oven to 350, and remove your dough from the fridge. While the oven is preheating, let the dough hang out and soften for a few minutes, then roll out to your desired cookie thickness. Gingersnaps are supposed to be fairly crisp, so I like to aim for about 1/4″ or thinner. Cut out desired shapes (I was boring this time and went with round, but you can use cookie cutters if you like) and place on a cookie sheet lined with parchment paper. Sprinkle with sugar, just for fun. Bake for 8-10 minutes (until the edges of the cookies start to turn golden brown) and cool before tasting. The cooling step? Not optional. If you try to sneak a cookie before they’ve cooled off, you’ll discover that they’re so soft that they’ll break into little mushy, delicious bits.

Of note: I chose to do round cookies with this recipe because the dough didn’t want to play nice with the more intricately-shaped cookie cutters. It was alternately too hard (right out of the fridge) or too sticky (after 10 minutes) and I couldn’t get the dough to the consistency I was looking for. But, that’s the way the cookie crumbles! I’ve got plenty of gingerbread recipes to try out, so expect to see an abundance of festive treats.

Indoor S’Mores

Love s’mores but don’t have a fire handy? Want something a little more…portable?

Behold, the indoor s’more:

These are super easy — albeit a bit messy — to make. It helps to have another pair of hands; setting up an assembly line cuts down on the melty marshmallow you’ll have to clean up later.

The Recipe: Indoor S’Mores

Yield: approximately two dozen
Time: 90 minutes, including cooling

1 bag mini-marshmallows
3 tbsp butter
1 tsp vanilla
2 bags semi-sweet chocolate chips
24 graham cracker halves (as close to squares as you get)

Do This
Line a baking sheet (or two) with parchment paper. Arrange the graham cracker halves on the sheet with about half an inch between each.

Melt the butter in a saucepan on low heat. Add in the mini-marshmallows, a handful at a time, and stir until melted. Mix in the vanilla, and remove from heat.

Carefully spoon marshmallow onto each graham cracker. If you can do this without it spilling over the sides, you’ll have a much easier time. Let the crackers set until the marshmallow has firmed up (this should take about 10-15 minutes).

Melt the chocolate chips in a double boiler (or the microwave).

Spoon a generous amount of chocolate over each graham cracker, and return to the baking sheet to set. If you’re short on time, slide the finished cookies into the fridge for a few minutes.

They’re not quite real s’mores, but they’re just as tasty, and perfect for bringing to a holiday party!

Blueberries, Pork, and Sharing

My super fabulous old roommate (Joy) and I like to share recipes, now that we don’t live together anymore. It’s like we’re eating dinner together, except not in the same room.

I opened my email this morning to find the following recipe:

You Need:
boneless pork chops
1 shallot, finely diced
1/2 cup red wine
1/4 cup water
1/2 cup blueberries
1/2 lemon (zest and juice)
2 tablespoons butter
Fresh parsley, roughly chopped

Do This:
1. Preheat the oven to 425°F.
2. Salt and pepper both sides of each pork chop. Heat a tablespoon of oil over medium-high heat in an oven-proof skillet big enough to hold all four pork chops.
3. Brown the pork chops, about 1-2 minutes on each side. Remove the pan from heat and pop it into the oven. Remove when the pork is just cooked through, about 10-12 minutes.
4. While the pork chops are in the oven, prepare the sauce. Heat a tablespoon of oil in a small saucepan over medium high heat.
5. Sauté the shallots until soft and golden. Add the wine and water and let boil down for 1-2 minutes.
6. Add the blueberries. When the skins begin to burst, add the lemon zest and juice. Let the sauce continue to boil and thicken until the pork chops are ready.
7. Once the pork chops are ready, remove the pan from the oven and place the pork chops on a cutting board and let them rest while finishing the sauce.
8. Turn the heat off under the saucepan and stir in the butter until it is completely melted. If using unsalted butter, add a pinch of salt.
9. Serve the pork chops either whole or sliced, topped with the blueberry sauce and fresh parsley. Since the pork chops were finished in the oven, they should still be nice and juicy.

Pork? Blueberries? Done.


My blueberry-red wine-shallot pork.


Joy’s blueberry-red wine-shallot pork. She had side dishes. And placemats. I think the words for that are Big. Time. Fancy.

Okay, so of course I had side dishes, but I was feeling super minimalist with the photos. That cherry tomato and green bean vinaigrette on her plate looks phenomenal, right?

The sauce is phenomenal. I love everything about it (except for the fact that it steams a lot while it’s reducing, so if you want a decent photo of the sauce midway through, you have to pull the pan off the stove).

Anyways, the moral of the story is that sharing is good. And that this blueberry-red wine-shallot sauce is so good that I’d eat it with a spoon.

All Your Eggs In One Basket

Usually a bad idea, unless we’re talking breakfast!


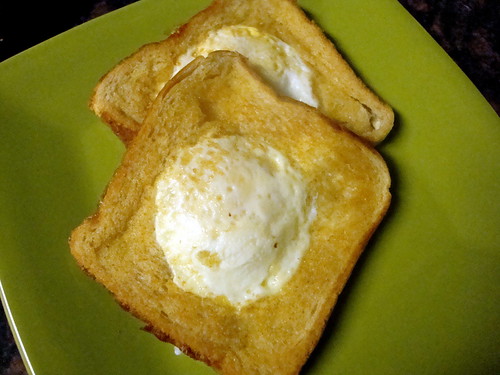
Let’s just ignore the giant fingerprint in the corner of the toast from where I got impatient and pulled it out of the pan with my hand instead of a spatula…

I like my toast very light, so my eggs in a basket aren’t quite as browned as some people like theirs. The good thing about preferring light toast is that the eggs end up cooking just perfectly.

Wanna make these? So easy:

Cut a circle out of a slice of bread. I used a cookie cutter, but I’ve heard that the top of a glass works just as well.

Lightly butter each side of the bread. It’s a little bit weird with the circle missing, but it’s better than cutting the circle out of a buttered slice and getting your cookie cutters all messy.

Turn the stove to medium heat, and melt a small pat of butter in a frying pan. Place the bread in the pan, and crack an egg into the hole you cut out of the bread. Cook until the whites of the egg are solid enough to flip the entire bread-egg combo as one piece. Flip, and cook for another minute or so (until the egg is cooked through and your bread is a bit toasted). If you like darker toast or a more well-cooked egg, cook for a bit longer.

This is now my preferred way to eat an egg.

Butter and Shortening. Not The Same.

So, I learned some things yesterday.

(1) My parents have not done much baking since I moved out of their house.

(2) Shortening does, in fact, have an expiration date. Even if it’s not printed on the container.

(3) Rancid shortening is one of the most foul things on the planet.

(4) Butter is only a semi-acceptable substitute for shortening.

All that aside, it is possible to make choreg without using shortening. It just doesn’t have the same dough texture — the dough is sticky and less friendly to work with. Simple solution: instead of braiding the choreg, make little roll shapes.
So…if your shortening happens to have gone rancid, and you’ve already started mixing everything else (cough, cough…who checks their ingredients first?), you can switch out the 1/2 lb of shortening for 1/2 lb (2 sticks) of butter. To compensate, you’ll need to add some extra flour — I honestly can’t tell you how much because I was just adding a tbsp at a time until it worked, but it was enough to make the dough not stick to my hands. Best guess? Another cup of flour.

(5) My old camera is not nearly as good as the other one. Everything looks so blurry!

On the bright side: no matter how ugly and pointy the choreg might look before they go in the oven, they’ll smooth out and look better during the baking process. I was seriously concerned with the sticky factor, but it looks like it’s not that big of a deal after all.

Want that choreg recipe? It’s right here.

Slow Buffalo

My friend Rick (aka The Rick) brought a slow cooker filled with delicious buffalo chicken dip to our Super Bowl party this year. He emailed me the recipe today, and I thought it was the perfect way to break in the new slow cooker!

The Recipe:
Buffalo Chicken Dip

3-4 boneless, skinless chicken breasts (mine totaled about 1.5 lbs)
1 cup hot sauce (I used 1/2 cup Frank’s Red Hot + 1/2 cup Frank’s Buffalo + a few shakes of Great Balls of Fire)
1 1/2 cups shredded sharp cheddar cheese
2 tbsp butter
16 oz (2 packages) cream cheese
1 cup ranch dressing
pepper and salt
celery, optional

Do This

Brush the chicken breasts with hot sauce, season with pepper and salt, and bake at 350 degrees for half an hour.

Remove the chicken from the oven, and let it cool until you are comfortable touching it. Shred the chicken into small bits.

Layer the shredded chicken, cream cheese, butter, hot sauce, shredded cheddar, and ranch dressing in the slow cooker, and turn the heat to high. Cook for about an hour, or until the dip is melty and gooey and just a bit bubbly. This is where the “slow” part of “slow cooking” comes in, but an hour really isn’t that terrible of a wait. Make sure to stir semi-frequently — you don’t want the liquid part of the sauce to burn to the sides.
Once the dip is done, switch the setting on the slow cooker to “warm” and serve! Chips, celery, and carrot sticks are all excellent vehicles for getting the dip to your mouth. I promise you won’t be leaving the cooker on “warm” for long.

Optional step if you want the dip to transform into a sammich filling: up the amount of chicken, and chop up celery and mix it into the dip, then spoon dip onto a bun.

If you like the heat: this dip is going to be a bit mild for you. Add in more hot sauce.

Foodbuzz 24, 24, 24: Dinner in Miniature

Bite-sized bonanza! Small foods smorgasbord! Petite party treats!

Whatever you want to call it, my offering for this month’s Foodbuzz 24, 24, 24 event is a selection of little dishes, all intended to be eaten in a single bite (or two!). Flatware-free eating, to encourage mingling at a fun little soirée.

I have a tendency to be super indecisive about what I want to eat at any given time (Bacon! Pesto! Cheese! Fried food! Cake! Did someone say bacon?), so I’m a giant fan of tapas, dim sum, and small plates in general. Lots of little bites, packed with flavor = the way to go.

And when I’m hosting? I want to show off my favorite flavors and play around with new techniques, but I also want to enjoy the party. So, without further ado: Dinner in Miniature, a selection of bite-sized treats for an evening get-together without the formality of a sit-down meal.

Olive You

Infused olive oils pair with bread, fresh mozzarella, and grissinetti to make a dipping tray worth gathering around.

Wanna make these hot-infused oils?

Start by selecting a flavor (I went with fresh ground black pepper, crushed red pepper, fresh basil, but you can get creative and try your favorite herbs and spices — or a blend). Pour a small amount of olive oil (2-3 tbsp) into a saucepan, and heat on low until the oil starts to bubble a bit. Add in a few herb leaves (or a few shakes of dry spices), and cook for several minutes, stirring constantly. Remove from heat before the spices turn brown (trust me — this does not smell good), and pour into a bowl or serving dish. Strain the oil if the herbs and spices are too large, or if you prefer a clear oil for dipping — I like to leave a bit of the herbs in, just to indicate what the flavor is. Pour in a tablespoon at a time of plain olive oil, taste-testing until the infusion is just right. Need more oil for lots of dipping? This recipe is easily doubled, tripled, or expanded as large as you need; just keep the ratios consistent with your favorite small batch.

To Eetch Their Own

Okay, so maybe this one requires more than one bite, but I’ve been dying to use the tomato-as-a-bowl thing for a while now.

I borrowed the eetch recipe from my great aunt Rose (also known as AR). Eetch (which has a Wikipedia entry!) is one of my favorite Armenian dishes. It’s excellent served cold, almost like a bulgur salad — it’s refreshing, and provides a nice, cool contrast to the heavier, warmer plates. Want AR’s recipe? Click here.

Everything’s Better With Bacon

Next up: a duo of bacon-wrapped goodies.

Scallops are a favorite, but they’re even nicer when wrapped in a bacon jacket.

These couldn’t be easier to make:

Season fresh scallops with salt and pepper. Wrap each with half a slice of thick-cut bacon, and secure with a toothpick (tip: soak the toothpicks in water before assembling to prevent burning in the oven). Broil for a few minutes, watching closely to make sure the bacon doesn’t burn. Flip each piece over, and continue to broil until the bacon is done (but not overcooked!) and the scallops are opaque.

More bacon-wrapped goodness:

Dates + almonds + goat cheese + bacon = win. Savory, sweet, and creamy, all at the same time.

The assembly line on this one is pretty easy, too. Slice bacon in half, slice dates in half, stuff dates with goat cheese and wedge almonds inside, close dates, wrap in bacon. Broil until the bacon is cooked.

Don’t Be Crabby…

Or do! These little mini crab cakes aren’t overloaded with breadcrumbs or fluff — the emphasis on crab makes them a little bit heartier.

Served in a ramekin with a slice of lemon — simple and perfect.

These guys are super easy to fry, and are done in minutes! (this recipe is also a bit too long for this post, but it’s inspired by the crab cake recipe in How To Cook Everything…check back soon, when I’ll change this text to a link to a new post with my recipe!)

Sweet Sippers

In shot glasses, of course!

Keeping with the one-bite theme, these bright-colored beverages were served in individual portions.

Blue: a citrusy blue “lemonade” with citron vodka and blue curacao.

Red: a cran-apple liquid Jell-o shot, made with cranberry-flavored gelatin (un-set), vodka, and apple schnapps.

Green: a shot that I like to call the “starburst,” due to its similarity to the candy of the same name. Vodka, peach schnapps, apple schnapps, lemon juice, lime juice, cranberry juice, and sugar.

Covert Confection

And after all of those savory treats: little pancakes, stuffed with mascarpone and chocolate hazelnut spread.

They look a little bit like cornbread, but they’re really dessert! Also…I couldn’t help myself when I saw the special stuffed-pancake pan at Williams-Sonoma. I snagged the batter recipe when I bought the pan — it’s super light and fluffy (and also huge…definitely one to pare down). Mastering the filling part was a bit of a challenge, and I definitely spent some time cleaning melted chocolate hazelnut spread off the stovetop, but it was completely worth it!

So…take a bite. Or several!

Thanks, FoodBuzz, this was an awesome time :)

Beef (actually) Stroganoff

Last time I thought about making Beef Stroganoff, I had no sour cream in the house, and it was super cold outside, so I wasn’t even going to think about walking to the grocery store for some old milk.

This time, I came prepared. Sour cream? Check. Paula Deen’s recipe? Check.

I thoroughly enjoyed this recipe, and it has restored my faith in Food Network chefs (cough cough, Alton Brown). The only modification I made was to add a little bit of minced garlic to the pan with the onions and mushrooms — Paula really nailed this, and I don’t think there’s anything else I could have done that wouldn’t have ruined it.

I’ve decided that this is one of the ugliest food photos I’ve taken. Oh no, I’ll have to re-make this and take a better one! :)

Unorthodox Techniques (Part 3: How to Melt Butter)

Sometimes, I forget to melt butter, and by the time I realize it should be softened instead of straight from the fridge, I’ve already poured sugar or something on top.

And that is how this technique was born:


Because metal bowls can’t go in the microwave.

Dear commenters, please please tell me that I am not the only person ever to melt butter with a space heater (or a hairdryer, because that was my first choice).

The Rice Stuff

One of my very favorite passed-down family recipes is for a simple, versatile side dish — rice pilaf. My gpa makes this at family gatherings, my mum would make it by request when we were kids, and now I make it.


Make extra. Trust me.

When I was small, I would eat at least half a batch myself. Most of the time, I’d just grab a spoon and eat it straight from the pan, which caused my family to set the rule of “Jenny gets pilaf only after everyone else has some.” Now, the rule goes something like “Jenny makes a double-batch because The Boyfriend eats as much pilaf as she does.”

Here’s enough for two very hungry people, or 3-5 not-as-hungry people.

The Recipe:
Rice Pilaf

1 tbsp butter
handful of fine egg noodles
1 cup long grain rice (not the instant kind!)
2 chicken-flavored bouillon cubes
2 cups water, boiling

Do This

Melt the butter in a medium saucepan over low heat. Once the butter is liquid, toss in a handful of fine egg noodles — I put in enough noodles to cover the bottom of the pan. Turn the heat up to medium, and brown the noodles, stirring with a fork. The butter should bubble up and foam a little bit.


Noodles!

While the noodles are browning, boil some water in a kettle or another pan. Measure out a cup of water, and dissolve the bouillon cubes in it.
Once the noodles have browned, pour the bouillon water, another cup of water, and 1 cup of rice into the saucepan with the noodles. Turn the heat to high, and bring the contents of the saucepan to a boil.
Turn the heat back down to low, and cover the pan with a lid. Let the pilaf simmer for 15-20 minutes (until the rice is cooked through). Fluff the pilaf with a fork, and enjoy!

This is an easy under-20-minute side dish, and it goes well with everything. Chicken, fish, beef, pork, salad, Krispy Kreme donuts…you name it. Feel free to double or triple the recipe as needed.