All Your Eggs In One Basket

Usually a bad idea, unless we’re talking breakfast!
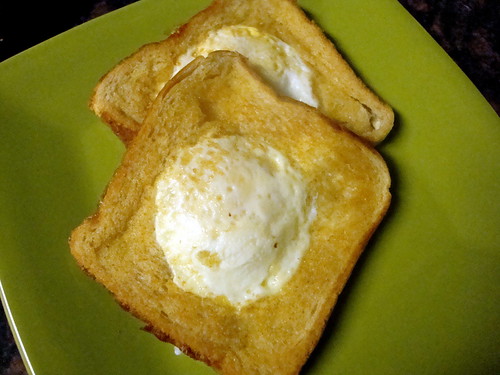

Let’s just ignore the giant fingerprint in the corner of the toast from where I got impatient and pulled it out of the pan with my hand instead of a spatula…

I like my toast very light, so my eggs in a basket aren’t quite as browned as some people like theirs. The good thing about preferring light toast is that the eggs end up cooking just perfectly.

Wanna make these? So easy:

Cut a circle out of a slice of bread. I used a cookie cutter, but I’ve heard that the top of a glass works just as well.

Lightly butter each side of the bread. It’s a little bit weird with the circle missing, but it’s better than cutting the circle out of a buttered slice and getting your cookie cutters all messy.

Turn the stove to medium heat, and melt a small pat of butter in a frying pan. Place the bread in the pan, and crack an egg into the hole you cut out of the bread. Cook until the whites of the egg are solid enough to flip the entire bread-egg combo as one piece. Flip, and cook for another minute or so (until the egg is cooked through and your bread is a bit toasted). If you like darker toast or a more well-cooked egg, cook for a bit longer.

This is now my preferred way to eat an egg.

Why, Yes, You CAN Mess Up Grilled Cheese

So, my classes this fall are pretty stressful. I’m sure you’ve noticed that I haven’t posted very much.

This is why:

Just kidding. I mean, I did ruin that grilled cheese (yes, that’s smoke near the top of the picture), but I’ve been working on some delicious recipes, too. In between scraping burnt cheese off of my frying pan and throwing out another melted spatula (if you’re keeping score, that’s TWO spatulas rendered useless).

And! Stick around for the month of October (at least!) because there are fun fall treats on the way AND a contest. And who doesn’t like winning?

Date Night

Oops, I mean Date-Nut. As in, Date-Nut Bread.

Dates and pecans? Go really well together. I’m a fan. This is like banana bread, but better (shh…don’t tell B!). And as much as I hate processed “butter” spreads, it tastes really good slathered with Country Crock.

I snagged the recipe from Good Housekeeping. I fully endorse it.

Also: go with fresh dates. Canned ones are for lazy people :)

Butter and Shortening. Not The Same.

So, I learned some things yesterday.

(1) My parents have not done much baking since I moved out of their house.

(2) Shortening does, in fact, have an expiration date. Even if it’s not printed on the container.

(3) Rancid shortening is one of the most foul things on the planet.

(4) Butter is only a semi-acceptable substitute for shortening.

All that aside, it is possible to make choreg without using shortening. It just doesn’t have the same dough texture — the dough is sticky and less friendly to work with. Simple solution: instead of braiding the choreg, make little roll shapes.
So…if your shortening happens to have gone rancid, and you’ve already started mixing everything else (cough, cough…who checks their ingredients first?), you can switch out the 1/2 lb of shortening for 1/2 lb (2 sticks) of butter. To compensate, you’ll need to add some extra flour — I honestly can’t tell you how much because I was just adding a tbsp at a time until it worked, but it was enough to make the dough not stick to my hands. Best guess? Another cup of flour.

(5) My old camera is not nearly as good as the other one. Everything looks so blurry!

On the bright side: no matter how ugly and pointy the choreg might look before they go in the oven, they’ll smooth out and look better during the baking process. I was seriously concerned with the sticky factor, but it looks like it’s not that big of a deal after all.

Want that choreg recipe? It’s right here.

Oh Aubergine

I have a new favorite sandwich.

I noticed that the Artisan Bread in Five Minutes A Day book has a selection of recipes meant to go with the breads, including sandwiches. This is my variation on the Aubergine Tartine.

The Recipe: Eggplant, Brie, and Red Pepper Sandwich
adapted from a recipe found in Artisan Bread in Five Minutes A Day
Serves: one
Time: approximately 30 minutes

two lengthwise slices of eggplant, about 1/2″ thick
half of a red pepper, sliced into strips (about 1/3 cup)
a handful of sliced onions (about 1/4 cup)
2 tsp minced garlic
4 tbsp brie or other soft cheese
two slices sourdough (or your favorite) bread
olive oil
salt
pepper

Do This

Brush the eggplant slices with olive oil (on both sides) and season with salt and pepper. Arrange on a foil-lined baking sheet, and pop into the broiler (on low, if you have multiple settings) for five minutes. Take the baking sheet out, and carefully flip the eggplant slices. Broil for five more minutes, or until the slices are soft and lightly browned.

Multitasking time: while the eggplant slices are in the broiler, drizzle some olive oil into a sauté pan, and sauté the onions, red peppers, and minced garlic for as long as the eggplant is broiling — or until they’re soft, but for me, this timed out perfectly.

Spread brie onto each slice of bread. When the eggplant is done in the broiler, stack the slices onto the bread, and top with the onions/peppers. Add a slice of romaine lettuce if you prefer, and close the sandwich.

If you used an oven to broil the eggplants, it should still be hot. Put the sandwich back on the baking sheet that you used for the eggplants, and slide it into the oven for two or three minutes. If you didn’t broil the eggplant in an oven, preheat your oven to 350 just before assembling the sandwich.

Enjoy the sandwich while it’s still warm and melty.

So…I’m officially sold on this Five Minutes A Day concept. I know, I know, it’s been less than a week, and new love is always the most exciting, but I can’t see myself getting tired of this anytime soon. The master recipe is way simple, and has me hooked on fresh baked bread — the baking stone is kind of living in my oven right now, and I’m excited to try out different bread recipes. This sammich recipe? Sealing the deal.

Okay, So It Takes More Than 5 Minutes

From start to finish, the artisan bread isn’t exactly the 5-minute deal that the book’s title implies, but I am so in love with how the bread tastes that I am completely unbothered by this. And, to be fair, the authors do clear up the whole 5-minute thing in the book — it’s 5 minutes of active work and a bit more time for rising, resting, baking, et cetera.

Time breakdown for my 5-minute-a-day bread:

Ingredients mixed together: 10:25pm
Dough rises in plastic container for 2+ hours: 1:26am
Dough is retrieved from fridge: 12:51pm
Ball of dough rests on pizza peel: 1:07pm
I remember to preheat oven: 1:47pm
Dough slashed and placed in oven (after extra rising time): 2:07pm
Bread retrieved from oven: 2:39pm
Delicious bread sliced and consumed: 3:26pm

Total time from start to finish: 17 hours 1 minute
Total time spent on bread today: 2 hours 35 minutes

I suspect that things will go much more smoothly (and faster!) next time I bake. I dragged things out by forgetting to preheat the oven. And sleeping.


The best thing since…well, you know.

Of note: I need a good bread knife. I used a steak knife to slice this because apparently I didn’t feel a need to own serrated blades before this.

My favorite thing about this bread is the moist, chewy interior. The so-called “custard crumb” effect that the authors described is surprisingly not difficult to achieve — I got it in my first try! The recipe is delightfully simple, and possibly fool-proof: I’m one to make every possible mistake (like not putting enough cornmeal on the pizza peel, or forgetting to preheat the oven), and my loaf turned out just fine, if a bit mis-shapen.

There’s a St. Louis Bread Co. Right By My House

It’s less than a quarter mile away, and they have a delicious green tea lemonade. Despite this, I opted to stay at home today and bake my own artisan bread.


As you can see, I was generous with the flour dusting.

I used the master recipe from Artisan Breads in 5 Minutes A Day, and here it is, fresh out of the oven. It’s not the nice, perfect round shape it’s supposed to be, but that’s my fault for way underestimating how much cornmeal to put on the pizza peel — there was a fight, and it involved a spatula and a wooden spoon, and the end result is a lumpy football-shaped loaf of bread. I also burned my hand pulling it out of the oven, but that’s standard.

It smells fantastic, though, and the second it’s cool enough to slice, I’m going to devour it. And later, I might share my notes.

Mac ‘n Cheese, Martha Style

Don’t compare this to the so-called macaroni and cheese that comes in a blue box and involves a mysterious cheesy powder. It’s not in the same ballpark. Not even close.


It’s not orange, and it doesn’t come in a blue box. It’s just really good mac ‘n cheese.

Martha Stewart’s Perfect Macaroni and Cheese recipe was the jump-off point. I made a couple of changes, one intentional and one accidental. The intentional change: adding a third cheese (sharp orange cheddar). The accidental change: adding an extra cup of milk (I was trying to count cups of cheese and cups of milk, and I got all tangled). The extra milk made the cheese sauce slightly thinner, but it’s not soupy at all. The orange cheddar added a nice kick.


Grated Gruyere. Not orange mystery powder.

Martha nailed this one. It’s easily the best mac ‘n cheese I’ve had yet.

However…there are some friendly little edits that might make it even better. Miss Roommate suggested (and I concur) that this might be improved by substituting the Gruyere with a sweeter cheese. Also? Gruyere and sharp white cheddar are not cheap. I’m going to give this another try with some cheeses that don’t cost over $15/lb, and let y’all know how that works out. And just for kicks, I might try it with some orange cheeses.

Also, the way it’s written, this is a 5-saucepan recipe. Something tells me that mac ‘n cheese should not be so complicated as to require that many saucepans (plus a casserole dish and a skillet). I went with a slightly-less-hassle execution of this dish. I love Martha, but she’s a little bit too intense sometimes. Reusing pans is good; so is reading over the recipe beforehand and figuring out which pans can be reused. Prep work, like grating the cheese in advance and cooking the pasta before working on the sauces, will save much hassle.

Fakesgiving!

Here’s a little teaser:


Clockwise from top left: dressing, cranberry sauce, crescent roll, corn, sweet potato casserole, mashed potatoes (no gravy! I forgot to add that before the photo, but it was really awesome), turkey, green beans. Also not pictured: chocolate mousse cake.

In short, Fakesgiving was a resounding success.

Recipes to follow all week long. My fav was the homemade dressing, which I totally improvised (don’t worry, I totally wrote down everything just for you!).

Spotted: Classy Party Sandwiches Watching Gossip Girl

Tonight was the season premiere of Gossip Girl.

Clearly, that’s an occasion for champagne and adorable little party sandwiches.


Cool as a cucumber? I’d say so.

I made some tzatziki sauce (or, well, an approximation thereof…I wasn’t using a recipe), sliced up the rest of the cucumber, and cut some pumpernickel into neat little crust-free pieces. It makes for a cute little party sandwich that’s ready in almost no time.

The Recipe:
Cucumber Sandwiches
pre-sliced pumpernickel bread (I bought Beefsteak brand)
half of one medium-sized cucumber
dill weed

Cucumber Yogurt Sauce
5.3 oz Greek yogurt (I used Oikos brand)
half of one medium-sized cucumber, peeled and seeded (3 1/2 tablespoons finely chopped)
1/2 tbsp fresh ground pepper
2 tsp olive oil
2 tsp minced garlic
1 tsp lime juice

Do This
If you happen to have a food processor, you can chop the cucumber up into little tiny bits with that. If you don’t (guess who doesn’t?), you can use a vegetable peeler to peel off very thin strips of cucumber, and then chop the thin slices with a knife. It works amazingly well, and the cucumber bits end up just as small as they would in a food processor. Chop up 3 1/2 tablespoons of cucumber.
Spoon the yogurt into a bowl, and mix in the cucumber, garlic, lime juice, pepper, and olive oil. Stir until well-blended, and refrigerate.

Stack several slices of pumpernickel bread on a cutting board. Using a serrated knife, trim off the crusts and cut the bread into neat rectangles. I managed to cut two rectangles per slice of bread. Snack on the crusts while you assemble the sandwiches.

Spoon a dollop of the cucumber yogurt sauce onto each slice of bread. Top with a slice of cucumber and a sprinkling of dill weed. Serve chilled.

My roommate just yelled the sauce ingredients to me from the kitchen while I posted this. Like I said, it may or may not count as real tzatziki sauce because I totally just glanced at the Wikipedia entry and approximated some measurements. It passes Miss Roommate’s “Greek test,” which is good enough for me.

These go quite well with champagne and guilty-pleasure TV.